Today you’ll learn how to add a post in WordPress for beginners, cutting out the complexity and making the process simple.
Adding posts in WordPress is as easy as 123 and an almost identical process to adding pages. In next to no time you’ll have your first post published
To learn the difference between a post and page visit our post describing the differences between posts and pages
How to add a post in WordPress for beginners
Blocks Editor
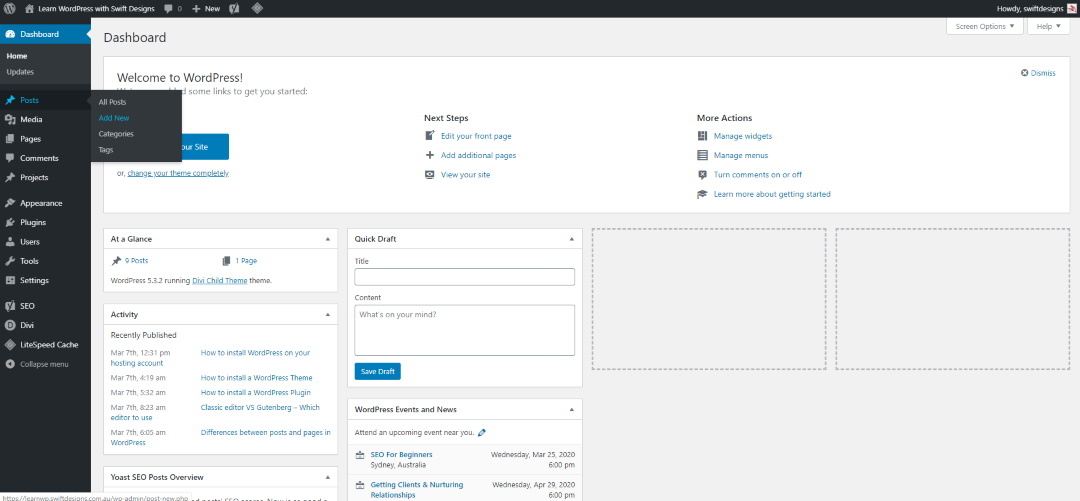
Step 1. Hover over Posts and click add new
Step 2. In the first field give the page a name and then enter some content below the title field.

3. It’s time to add some content. Before you can fully understand How to add a post in WordPress, we’ll run through the blocks process and what each block section can do. Begin by clicking the little + in the circle. This is your blocks container and it contains all the different block elements you can use to create beautiful pages on your website.

4. At the top is a search bar that you will be able to use to quickly find the block you need to use. Below the search field the container is broken into different sections which we will explain below.

 5. Common blocks
- Image. The image bock will allow you to insert an image into the post. You will be able to add a link to the image and align it to the left, right or center
- Paragraph. This block will create a standard paragraph block
- Heading. The heading block will allow you to use different heading tags, from H1 down to H6
- Gallery. The gallery block will allow you to add a gallery of images to your post. This is useful for displaying a variety of images. You may find that a third party plugin will generate more visually appealing and customisable galleries.
- List. This block will allow you to create different lists. Either dot point ones, such as here, and numbered lists.
- Quotes. The quote block will allow you to insert a quote section. The quotes are styled differently from the rest of the content on the page.
- Audio. The audio block will allow you to upload audio files to be played on the page
- Cover. The cover block is a cover image. A cover image in Gutenberg blocks allows you to place text over an image. The image can be stationary while the text moves, or the text can move witht he image.
- File. The file block will allow you to upload a file tot he editor
- Video. With the video block you can add your own videos. It is advised not to do this as self hosted videos can cause performance problems on budget hosting and slow a website down significantly. It’s recommnded to use a video hosting website such as YouTube of Vimeo instead
6. Formatting
- Classic. The classic block will allow you to use the classic editor on the page. While not the full version of the classic editor, it is close enough for those who are making a teansition to the blocks editor.
- Code. The code block will allow you to add a code field. The code in this block will not be generated on the page, but serves as a field for other users. Websites which may use such a feature include tutorial websites that offer code snippets
- HTML block. The HTML block will allow you to place custom HTML content that will be generated and displayed tot he user. PHP code will not work in this block
- Preformatted. This block allows you to write text and keep all spaces, line-break intact. Basically, this Block displays the text exactly as you type. This block is similar to the text and code block
- Pullquote. The pullquote block takes an existing piece of text from the main content of your article, and calls attention to it in a graphical way For example, you could make this section stand out on its own so that attention is drawn to it.
- Table. The table block will allow you to create HTML tables. Don’t go overboard with this one as HTML tables are notoriously difficult to work with on mobiule devices, but they still have their place.
- Verse. The Verse Block in Gutenberg allows you to write a verse or poetry. The behaviour is similar to the preformatted block
7. Layout elements
These elements add enhancements that were missing from the old classic editor
- Button. Create a button on your post. this can be perfect as a call to action
- Columns. Add columns to the page layout. You can use the columns for anything from a pricing table to a menu
- Groups. The groups block will allow you to nest other blocks inside of it, giving you more flexability witht he page layout. Using the groups block you can create even more visually and complex pages
- Media and text. the media and text block will allow you to pair up an image with text. This is perfect for an image block or for testimonials. The default is for the image to appear on the left and text on the right
- More. The more block in Gutenberg is used to truncate the content for the homepage, archive pages or subscriber emails. In themes which don’t truncate the post on those pages, use this block to forcefully truncate the text. All text before this block will appear on those pages followed by a read more link. this is great for increasing page views and reducing bounce rates, but isn’t needed on the majority of themes
- Page break. If you have an extremely long post that has many images the page break block will help the performance by splitting the post into smaller pages. At each page break block it will add a next page option for readers to click onto the next.
- Separator. The separator block simply adds a line to the post which can be used to define secions on the post. It can be either a solid line of botted, depending on your preferences.
- Spacer. Similar to the separator block, the spacer block separartes sections. Instead of adding a line, the spacer block adds empty space.
8. Widgets
The widgets blocks shouldn’t be confused with the widgets that are often mentioned in WordPress. these widgets appear within the post content and offer different functionality.
- Shortcode. Use this block to add a shortcode to a past.
- Archives. This block is similar tot he archives widget in the widgets section. It displays the monthly archives of your blog posts in a month by month list which links to the respective archive pages
- Calendar. It shouldn’t need an explanation. We all have one in our house and on our phones
- Categories. The categories block will display a list of the categories on your site
- Latest Comments. This block will display a list of the most recent comments on your website
- Latest posts. This block will display a simple list of the lastest posts on your site
- RSS. The RSS block will display a list of your RSS feed posts
- Search. the search block will display a search box where you place it
- Tag cloud. the tag cloud wil display a list of all the tags you use for your posts and link to the archive page of those individual tags
9. Embeds
The embed section contains a long list of all the embed blocks which can be used on your page. I won’t run through all of them as they all work the same way.
If you’ve visited a site and seen tweets, facebook posts or Instagram posts embedded on the page these are the blocks which will help you achieve the same look. All you need to do is copy the URL of the content you wish to embed and WordPress will automatically add it to your post
10. Now you have the blocks and know what each one does, it’s time to start adding content. the majority of the time you spend writing you’ll be using images and either classic editor or paragraph and heading blocks. these will be the most common blocks that you will use. As you use blocks more frequently WordPress will add them to your most used section in the container
11. Add some content
- Select the paragraph block by clicking on the + icon in the circle then paragraph. Begin typing something out.
- Next select the image block. You can add an image by dragging and dropping the image into the block or select and find the file to use.
- Next add another paragraph block and enter more words. Do this a couple of times for now until you are familiar with it
- We need to add a link to the text. Thankfully WordPress makes this very easy. Copy a URL you want to link to. Next highlight some text. Click the chain icon and paste the URL into the URL box. If you want the link to open in the same window click on the enter icon but if you want the link to open in a new tab click the down arrow. Toggle the icon to open the link in a new window.
- Now we’ll add a youtube video. Go to youtube and find a video to add to the post. Copy the URL and then select the YouTube block by selecting the + in the circle then embeds, YouTube. Paste the URL into the URL field and the video will magically appear.
As you can see, there are quite a lot of blocks, and it can seem daunting. But the reality is you will probably only ever need two to three for the majority of posts you write, and those blocks will always be available. Also, when you ress enter it will instinctively create a new paragraph block. It’s probably important to add that to this beginners guide on How to add a post in WordPress.
After adding content
We’re over halfway through our guide on how to add a post in WordPress for beginners and nearing the end. After you’ve added the majority of your content to the post you’ll have a few more things to do, and these are found on the right sidebar. Note. Most of the options below won’t need to be altered and you can simply click publish whe you are ready.
Click the Document tab so that you see all sections available for the page

Status and visibility. The status and visibility section will allow you to change how and who gets to see your post.
- Click public next to visibility. I will open a box. In the box will be the three otpions for the page access. Public, which means anyone can view it. Private, which means only visible to site admins and editors. Password protected which means it’s protected with a password you choose. Only those with the password can view this post. Default is public.
- Publish. Click immediately next to publish. You can schedule the post to publish at some point int he future or immediately when you are ready. Scheduling posts can be a great way to plan for a rush of interest and traffic and build anticipation. Default is to publish immediately.
- Post format. You can change the visual way the post looks. Most posts will be standard.
- Stick to the top of the blog. You can set the post as a sticky post. A blog traditionally places new content at the top, but a sticky post will place the post above the most recent post. this is great for attention grabbing posts that can grab interest.
- Pending review is similar to draft. Pending Review means the draft is waiting for review by an editor prior to publication
Permalink. The permalink, or URL of the post. You can edit this, but WordPress usually creates the links itself. Leaving it to WordPress will avoid conflicts
categories. This is where you select the category for the post. Categories help connect posts together in an organised way. By default all unasigned posts will be given the uncategorised category, but you can change it or add more. To add a new category click the Add New Category link.Give the category a name and a parent category if it has one. Categories can have parents and children, allowing you to group posts together in more ways.
Once you have given the category a name and selected a parent if it has one, click the add new category button. It will add the category to the list of categories and preselect the category for the post
Tags. Tags are similar to categories, but they don’t have a heirachy. Tags can be used for linking similar posts that either appear in the same category or different ones. Tags used to be extremely powerful, but their popularity has waned in recent years.
Featured image. Add a featured image to your post. All themes are different in how they use the featured image, but it’s a good idea to use one.
The featured image will be used on the blog feed and archive pages. It can be used to give a visual signal of what the post is about. Some themes will display the featured image at the very top of the post before the content.
Excerpt. the excerpt can be used for the preview text on some themes that appears below the title and image on archive pages and the blog feed.
Discussion. This section relates to comments.
Comments. Allow comments or turn them off. This is a personal preference. With good comment spam control there’s no reason to disable comments as they can help generate both SEO content and traffic.
Allow Pingbacks & Trackbacks. I recommend leaving this option off. This is a relic of the early days of bloggin and is used to connect blogs around the web. unfortunately spammers can use this to their advantage, so it’s often better to just disable.
Publishing
Once you have completed everything it’s time to publish your piece of artwork. At the top right of the screen is the publishing options. You can save as a draft or switch back to a draft if already published. Next to that is a preview button. It will allow you to visually inspect the post as it will appear on the front of the website once published.
To the right of the preview button is the publish button. This will send the post live. If the post is already published this button will be renamed update.
The cog icon. The cog icon will remove the sidebar to create a distraction free writing experience. Simply click the cog again to return it.
We appreciate that this has been a long post, but the step by step process along with the outlining of each block and feature will allow you to master and easily understand the process of how to add a post in WordPress for beginners.
If you’d like to learn more about how to add a post in WordPress for beginners, WordPress.org has some great learning resources available